
How to laminate flag football wristband cards
Paper play cards don't survive sweat and a wet field for long. Laminating them takes ten minutes and makes them last the season, as long as the finished card still slides into the wristband window. Here's which pouch to buy, two ways to laminate, and what to do if you don't own a laminator.
- Use 3 mil letter-size pouches. Thicker pouches make a stiff card that often won't slide into the window.
- Quick method: laminate the printed sheet, then cut on the lines. Good for most games.
- Sealed method: print the cards ¼ in smaller, laminate them with gaps, and trim leaving ⅛ in of plastic. The finished card still matches the window.
- Let inkjet prints dry fully before laminating. Always test-fit one card first.
- No laminator? Self-seal sheets or clear packing tape on both sides work.
What you need
- Printed cards. Print them at 100% (Actual size), not "Fit to page". Our free play maker prints wristband cards at true size on 8.5 × 11 paper with a 1-inch check square.
- A thermal laminator and 3 mil letter-size pouches. Letter pouches (9 × 11.5 in) take a full 8.5 × 11 sheet with a sealed border. Most home laminators handle 3 and 5 mil.
- A paper trimmer or sharp scissors. A trimmer gives straight edges on laminate much more easily than scissors.
- A corner rounder (optional). A small punch that rounds the corners so they don't poke the wrist or tear the wristband's sleeve.
Pick the right pouch thickness
Pouches are sold by thickness in mils, thousandths of an inch, and the number is usually per side. A 3 mil pouch puts 3 mil of plastic on each face of the card. That matters because a wristband window is a snug vinyl sleeve:
- 3 mil: thin and flexible. The best choice for wristband cards; it slides into most windows and bends with the band.
- 5 mil: stiffer. It fits some bands, especially looser adult ones, but test one before you do a whole batch.
- 7 to 10 mil: rigid, like an ID card. Usually too thick for a wristband window and uncomfortable on the arm.
Use regular 20 to 24 lb printer paper or a light card stock under 3 mil lamination. Heavy card stock plus lamination adds up to a card that won't fit.
Method 1: laminate the sheet, then cut (quick)
- Print one sheet and check the size. Measure the 1-inch square on the sheet. If it's off, turn off "Fit to page" and print again.
- Test-fit one paper card in your wristband before laminating anything.
- Let the ink dry. Give inkjet prints several minutes, longer for dark, ink-heavy pages; heat can smear wet ink. Laser prints can go straight in.
- Laminate the whole sheet in a 3 mil pouch on the laminator's 3 mil setting, sealed edge first.
- Let it cool flat. A book on top for a minute keeps it from curling.
- Cut on the lines with a trimmer, then round the corners.
The cut edges of each card are open paper. Inside a wristband sleeve that's fine for most games, but in a downpour water can slowly wick in from the edges. If you play in the rain a lot, use the sealed method.
Method 2: fully sealed cards (for rain and sweat)
A fully sealed card has clear plastic all the way round, so no paper edge is exposed. The catch: that border makes the card bigger, about ⅛ inch on every side. So print the card smaller to start with.
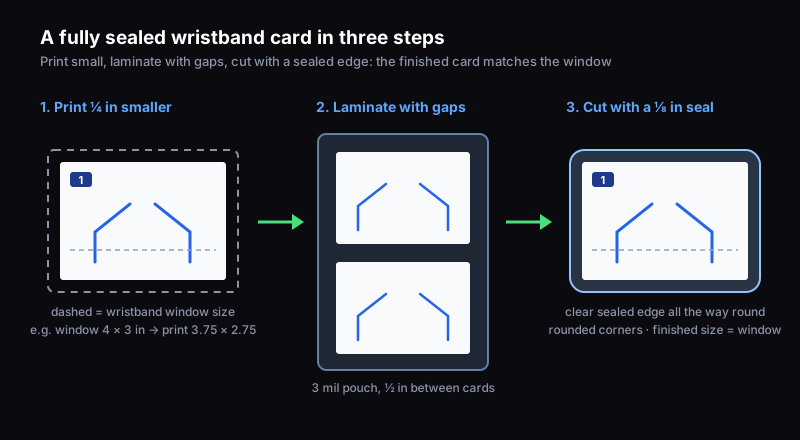
- Print the cards ¼ inch smaller than the window. In the play maker, choose Custom size and enter the window size minus ¼ inch each way. For a 4 × 3 in window, print 3.75 × 2.75 in.
- Cut the cards out on the lines.
- Lay them in the pouch with gaps, about ½ inch apart and at least ¼ inch from the pouch edges, so every card gets a full seal.
- Laminate and let the pouch cool flat.
- Cut each card out leaving ⅛ inch of clear plastic all the way round, then round the corners.
The result is exactly the size of the window, with every edge sealed. It takes a few more minutes than method 1 and is worth it for the cards your QB wears every week.
No laminator? Four options
- Self-adhesive laminating sheets. No heat and no machine: peel the backing, lay the card on, smooth out the bubbles, and trim. Use the same sealed-border trick for a waterproof edge.
- Clear packing tape. Cover both sides, overlapping past the card's edges, then trim leaving a little tape border. Cheap and surprisingly durable for a season.
- Waterproof printer paper. Synthetic papers are made for either inkjet or laser printers, not both, so buy the kind that matches yours. The card is waterproof without laminating.
- Just the wristband's window. Most wristbands have a clear vinyl sleeve that keeps a plain paper card dry enough for a game in light weather. Print spares.
Fit, care and spares
- Always test-fit one card before laminating or cutting a batch. Window sizes vary by brand, sometimes by a quarter inch.
- Laminate spares. Cards go missing. With the play maker's "Fill the sheet" copies setting, one laminated sheet gives you a backup of every card.
- Keep them out of hot cars. Laminate is heat-sealed plastic and can curl if it's left on a dashboard in the sun.
- Wipe, don't scrub. A damp cloth cleans laminated cards; solvents can cloud the plastic.
- Reprint when the playbook changes. An out-of-date card is worse than no card. Keep your playbook file from the play maker so next season is a two-minute reprint.
Frequently asked questions
What thickness laminating pouch should I use for wristband cards?
Use 3 mil pouches. Pouch thickness is quoted per side in mils (thousandths of an inch), so a 3 mil pouch adds 6 mil to the card. That keeps it thin and flexible enough to slide into a wristband window. 5 mil pouches work for some bands but make a stiffer card, and 7 to 10 mil pouches are usually too thick.
Can I laminate wristband cards without a laminator?
Yes. Self-adhesive laminating sheets work without heat: peel, press the card on, and trim. Clear packing tape on both sides, overlapping the edges, is the cheapest option. You can also print on waterproof paper made for your printer type, or skip lamination and rely on the wristband's clear vinyl window.
Should I laminate wristband cards before or after cutting them?
For a quick card, laminate the whole printed sheet and then cut on the lines; the cut edges are open, but the wristband sleeve protects them. For a fully sealed card that survives heavy rain, cut the cards first, laminate them with gaps between them, and trim leaving an eighth of an inch of plastic. Print the cards a quarter inch smaller so the finished card still fits.
Why won't my laminated card fit in the wristband?
Usually one of three things: the page printed scaled down or up (print at 100% and check the 1-inch square), the pouch was too thick, or you added a sealed border without printing the card smaller. A sealed border adds about a quarter inch to each dimension, so shrink the printed card to match.
Do I need to laminate wristband play cards at all?
Not always. Most wristbands have a clear vinyl window that keeps a paper card dry enough for a game in light weather. Laminating makes cards last a whole season, survives rain and sweat, and lets you wipe them clean, so it's worth doing for the cards you'll use every week.
Make the cards first
Draw your plays in the free play maker, or start from the play library, and print numbered wristband cards and a coach's call sheet at true size on regular paper. No sign-up.